

Are you familiar with Hyper V, the Microsoft virtualization technology? It is a powerful solution for creating and managing virtual machines, and it is available for free on Windows. This guide will show you how to activate Hyper V on Windows and get started with it.
1.Check if virtualization is enabled
The first step to activating Hyper V is to ensure that virtualization is enabled on your system. Virtualization is a technology that allows multiple operating systems to run on the same computer. It is necessary for Hyper V to work correctly.
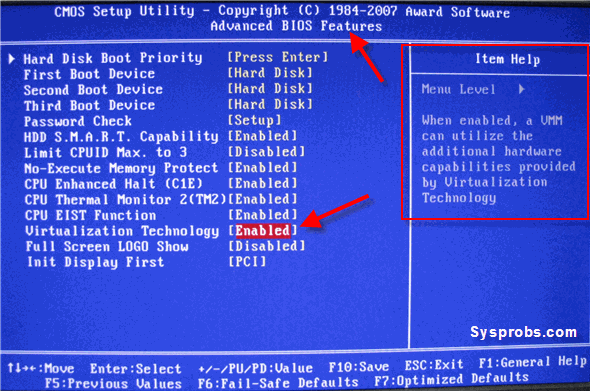
To check if virtualization is enabled, you will need to access the BIOS menu of your system. Every computer manufacturer has a different method for accessing the BIOS menu, so you should refer to the user manual of your computer for specific instructions.
Once you are in the BIOS menu, look for an option labeled “Virtualization” or “VT-x”. Make sure this option is enabled. If it is not, enable it and then save your changes and exit the BIOS menu.
2.Enable Hyper V on windows
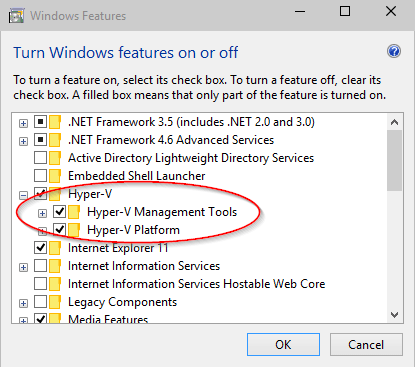
Now that you have ensured that virtualization is enabled on your system, you can go ahead and activate Hyper V on Windows. To do this, go to the “Control Panel” and select “Programs and Features”. You should see an option labeled “Turn Windows features on or off”. Click on this option.
In the window that opens, you should see a list of Windows features. Scroll down to the bottom and check the box next to “Hyper V”. This will enable Hyper V on your system. Once you have checked the box, click “OK” to save your changes.
3.Reboot the system
After enabling Hyper V, you will need to reboot your system for the changes to take effect. Once your system has rebooted, you should be able to access Hyper V from the “Start” menu.
#Conclusion
Activating Hyper V on Windows is a relatively simple process. It involves checking if virtualization is enabled on your system, enabling Hyper V from the “Control Panel”, and then reboot your system. Once you have followed these steps, you should be able to access Hyper V and start using it.
Thanks for reading this article! If you have any questions then comment below.


